Ask This Old House Season 24 Episode 8: A Lawn Regrade, Shade-Tolerant Plants, and a Solid-Core Door That Actually Hits Different
Lee Gilliam tackles a lumpy, mossy backyard with a dethatcher, a leveling rake, and a toddler’s help. Jenn Nawada breaks down houseplants by light exposure. Nathan Gilbert swaps hollow-core interior doors for solid-core slabs—and shows why rushing to prehung is a mistake.
Three house calls, one quiet thread: the gap between what a home does and what owners wish it would do. In season 24, episode 8, a lawn that holds water, a living room that murders plants, and a hollow door that broadcasts every bathroom noise get their fix. Lee Gilliam makes a backyard less swampy, Jenn Nawada builds a plant survival guide for the light-starved and sun-scorched alike, and Nathan Gilbert proves that a heavier door doesn’t need a heavier remodel. None of it is dramatic, which is exactly why it works.
Lee Levels a Backyard With Help From a Very Small Crew
Matt and Brooke’s yard had the classic shady-lawn triple threat: moss, bare mud, and water that pools near the house in winter. Lee crouches down and reads the thatch, the canopy, and the soil surface the way a mechanic listens to an idle. Too much leaf litter and matted stems are choking the existing grass. The canopy from nearby trees keeps the sun off, which is the deeper problem—but that’s for another day. For now, Lee outlines a reset: dethatch to let oxygen in, add lime to fix the pH, level the low spots with loam, seed, and cover with peat moss to incubate the germination.
He starts the couple on a manual thatch rake, more demonstration than prescription. Within minutes he admits there’s a rented dethatcher on the truck that will “save our arms, work a little smarter.” Watching someone yank matted debris with a rake is useful only long enough to understand why you want the machine. After the dethatcher passes, the yard looks beaten up and open, which is exactly right.
The leveling process is where Lee’s real tradecraft shows. He uses a wide leveling rake, laying it flat and working it back and forth until it finds the existing grade. Matt asks whether to push or pull—Lee says both. The rake shaves high spots into low ones without gouging. Soil chunks get broken with a hand fork. This is the kind of work that looks easy on camera because a pro is doing it; a first-timer will discover how quickly it becomes a full-body workout.
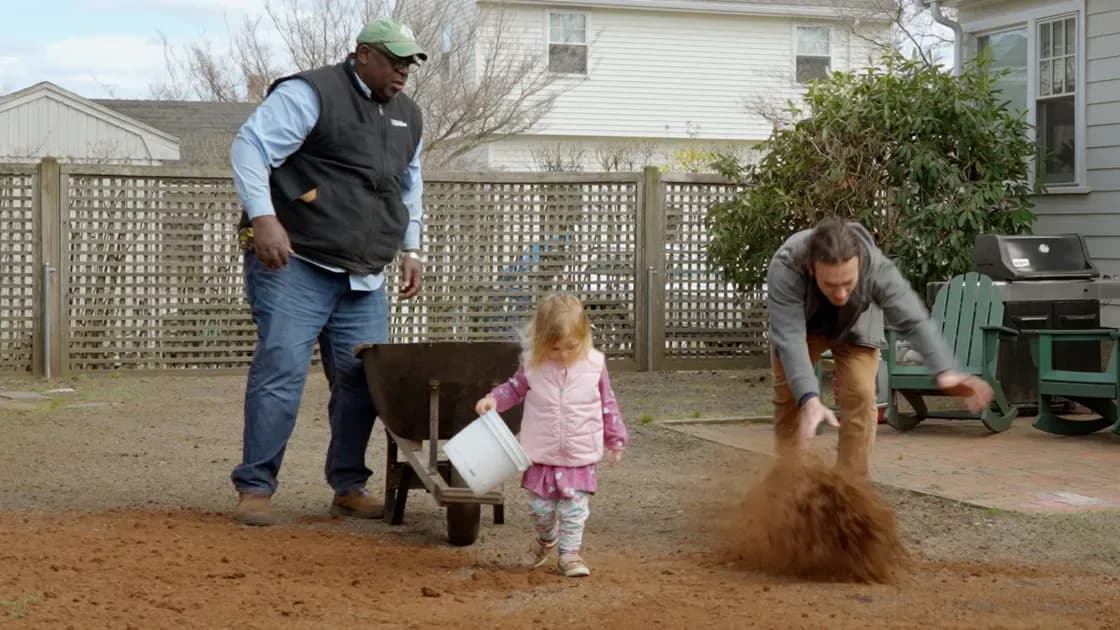
Lime comes out of a broadcast spreader set to open at about 20, after a test pass at 10. Lee explains it will “sweeten up” the soil, nudging pH upward—moss thrives in acidic conditions, so this is the chemical countermove. Then the seed: a fescue–Kentucky blue mix with a blue coating that holds moisture around each seed, from a bucket rather than a spreader because the area is small enough to control by hand. Violet, the toddler, gets recruited to toss handfuls. Lee doesn’t pretend this is critical labor; it’s a nice moment that will probably stick with a kid more than the grass will.
Final step: peat moss, scattered low to avoid blowing away on the windy day, then flipped lightly with an inverted leaf rake just to nestle seed against soil. Lee’s instruction is to water daily—twice daily if possible—until germination. The transcript says “Water every day” and then they leave. It doesn’t show the weeks of consistent moisture required, but anyone who’s tried to keep a newly seeded patch damp through a dry spell knows that’s the real commitment. Playground chips go into the truly shaded corner where grass won’t thrive; Lee specifies tumbled chips, no splinters, good for bare feet and small hands.
What the segment doesn’t address: the canopy. Lee calls it out at the beginning but punts to “the future.” That’s honest—pruning big shade trees is a separate project with its own season, safety gear, and potential arborist consultation. Homeowners should hear that as “you’ll need to do this eventually” rather than “the lawn will fix itself.”
Jenn’s Low-Maintenance Plant Hierarchy (Zero Green Thumb Required)
Kevin meets Jenn in a greenhouse setting and immediately flags himself as a plant killer. Jenn responds with three tiers organized by light, not by plant type. That’s a smarter teaching frame than botanical Latin: full sun (cactus, zebra plant, aloe), bright indirect (ponytail palm, croton), and low light (philodendron, ZZ, snake plant, pothos). Kevin latches onto the low-light category with audible relief.
The numbers matter. Full-sun plants want six hours of direct light—window sill, south-facing, no obstruction. Bright indirect means six hours of light that’s strong but not hitting the leaves directly. Low light drops to two to four hours. That’s the detail to write down, because “low light” doesn’t mean “no light.” A snake plant in a windowless bathroom will slowly starve. Jenn doesn’t hammer this, but the difference between surviving and thriving lives in that two-hour minimum.
Soil and watering get the most practical explanation. Succulents and cacti need chunky, fast-draining mix; their roots should never sit in water. For pots without drainage holes, Jenn recommends keeping the plant in its nursery pot, watering until it drains, then putting it back into the decorative cachepot—a trick that prevents the rot Kevin’s already worrying about. For everything else, she offers the one-inch finger test: dry down to the first knuckle? Water. This is the kind of instruction that sticks because it’s tactile, not timed.
Fertilizer gets a quick nod: water-soluble, read the bottle for dosage, note that cactus fertilizers differ. Jenn doesn’t overexplain. The segment runs tighter than some of her earlier garden walkthroughs, partly because Kevin keeps asking follow-ups—when he dryly whispers “This one needs water” about a plant in front of him, the pace stays conversational rather than feeling like a lecture. In a previous houseplant segment I found myself checking my watch, but here the editing gives just enough repetition to teach without dragging.
Nathan Replaces a Hollow-Core Door Without Tearing Out the Jamb
Henrik wants solid doors for two reasons: the feel and the sound dampening. His daughter’s bedroom and an office share walls with the bathroom, so every flush and fan hum announces itself. Nathan immediately spots the existing three-hinge setup and notes the hollow-core six-panel style, then asks the question that will save Henrik a weekend of trim work: slab only, or prehung? Henrik chooses solid-core slab, same size—2-6 x 6-8 in door-speak, roughly 29¾ by 80 inches. Prehung would have meant pulling casing off both sides, disposing of a perfectly good jamb, shimming a new one, and repainting trim. The slab route trades that for careful measurement transfer.
The process is a clinic in repetition and jigs. Nathan stacks the old door on top of the new slab, lines up the stiles, and transfers hinge and lockset marks. He uses a commercial jig for the hinge mortises—an affordable kit with interchangeable plates—and a shop-made door buck to hold the slab at a comfortable working height. The buck is just a few boards clamped together, but it lets him mortise without stooping. Henrik drills and screws the hinges; Nathan follows behind driving pins. For a guy who once installed a medicine cabinet with the same quiet precision, the custom jig is on-brand.
Boring the lockset hole gets the standard warning: drill through one side until the pilot bit pokes out, then finish from the other to prevent blowout. The solid-core slab is 1⅜ inches thick, so a standard hole saw does fine. Nathan uses a self-centering drill bit for the hinge screws—a small tool that eliminates a ton of frustration when you’re driving short screws into a hinge leaf and need them dead center.
The door closes clean on the first test. Revels are even, the latch slides home, and the solid thunk is the whole point of the exercise. Nathan’s homework: prime any raw cuts from the mortising and drilling, then two coats of finish paint. Henrik seems game. One thing the segment doesn’t show: solid-core doors are heavy. The existing hinges and jamb can take the weight, as Nathan confirmed, but hanging one alone is a test of forearm stamina. Having a second set of hands (Henrik) makes the work go from awkward to straightforward.
DIY Confidence Scale
Lawn regrade: Moderate. The techniques are simple—dethatch, spread loam, rake level, seed, cover, water—but the labor is real. Renting a dethatcher is easy; using it without scalping the lawn takes a couple passes to learn. The leveling rake requires some feel, but you’ll develop it by the time you’re done. Knowing when to add lime means a soil test first (not shown, but implied by Lee’s diagnosis of moss). Watering commitment lasts weeks.
Houseplants: Easy. The hardest part is remembering the light conditions in your actual rooms and matching them to the plant tags. Jenn’s finger-in-the-soil test removes guesswork. Buy the plant, know your window orientation, water when dry. The margin for error is wide with the low-light species she recommends.
Solid-core door swap (slab only): Intermediate. You need a drill, hole saw, chisels or a hinge-mortising jig, and the patience to transfer measurements precisely. No router required if you use the jig Nathan showed. The self-centering bit is a $10 lifesaver. If you’re comfortable hanging pictures with anchors and know how to keep a drill square, you can pull this off. If your existing jamb is out of square, though, this job gets harder—Nathan’s cameo didn’t face that challenge.
Additional Resources
Henrik’s new door closes with a thud that makes the whole hallway feel more finished. That’s a small change. The lawn will need weeks of water and months of root growth before Matt and Brooke can run barefoot. The plants live or die on a windowsill somewhere, subject to Kevin’s attention span. Three different time signatures, one show. The part that sticks: all three fixes cost more in patience than they do in parts.
Keep reading