
Ask This Old House S24E5: Green Giant Arborvitae, Fireplace Tools, and a Rolling 2x4 Tote Rack for the Bin You Always Need on the Bottom
Lee Gilliam helps Rhonda replace a missing privacy screen with Green Giant arborvitae, Mark McCullough sorts the fireplace set by safety and function, and Tom Silva builds a rolling 2x4 rack so six storage totes slide out individually instead of becoming a stack.
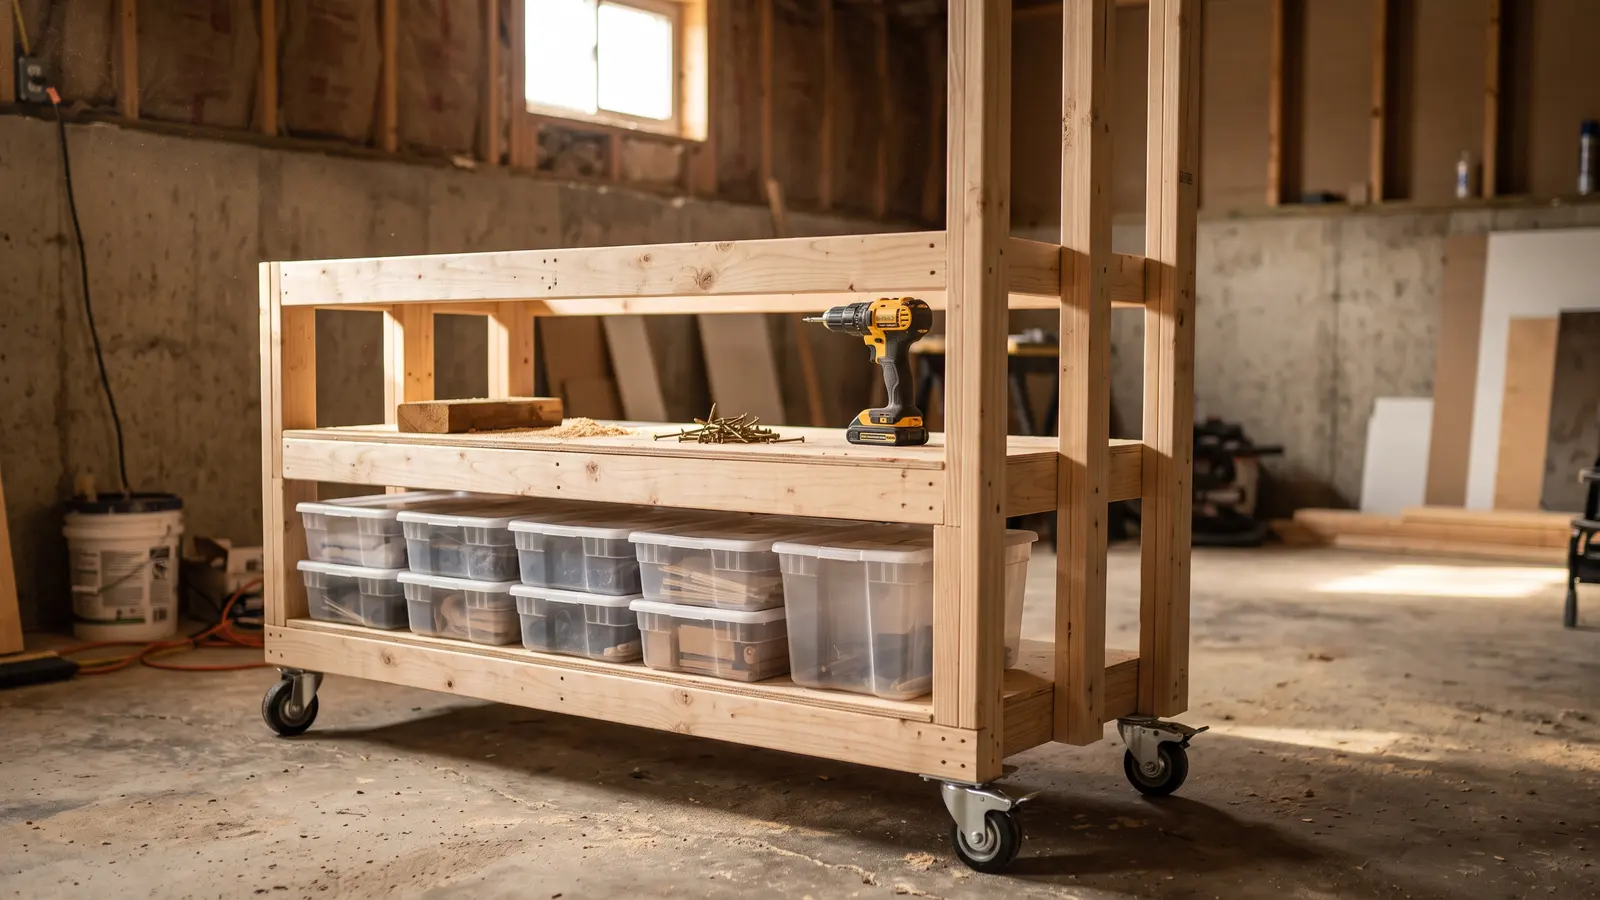
Season 24, Episode 5 of Ask This Old House splits its time between a backyard privacy border, a fireplace tool tour, and a rolling storage rack. The through-line is not a single trade or material. It is access: the view you cannot screen, the tool you need while the fire is live, and the tote you cannot reach without unloading five others.
Lee Gilliam’s privacy border starts with the right arborvitae
Rhonda’s neighbor removed trees behind her fence, leaving an open view and a blank white fence that needed breaking up. Lee Gilliam brought three arborvitae varieties for her to compare, and the choice mattered more than the planting.
The Emerald Green stays narrow and compact, but Lee judged it too small for the space. The Dark American gets tall and wide, and it carries a problem for this region: multiple leaders. Heavy wet snow can open those leaders up, which means tying or pruning later. The Green Giant won on a single leader, deer resistance, about 12 inches of growth per year, and a mature height in the 30-to-40-foot range. That last number is the one homeowners should sit with before digging. A privacy screen that outgrows its bed stops being a screen and starts being a future removal project.
A bed, not just holes in the lawn
Lee did not plant straight into the grass. He measured 40 inches off the fence, marked a row of holes at 5 feet on center, and used a sod cutter to strip the lawn. Then a rototiller loosened the soil and let oxygen in. Organic fertilizer and compost went into the backfill.
The hole depth was 11 to 12 inches for a root ball that measured about 12 inches. Width went a little wider than the root ball so the amended soil could surround it. The root ball was root-bound, so Lee opened and scratched the roots before planting. After backfill, he added about 2 inches of mulch and gave Rhonda the real homework: water daily for two weeks unless rain does the job.
For a homeowner, the planting itself is approachable. The prep is where the clock goes. Sod cutting, rototilling, compost, and two weeks of watering are not glamorous television. They are also the difference between a tree that establishes and a tree that sulks. The lawn regrade in S24E8 shares that logic: the visible planting is the easy part.
Mark McCullough treats fireplace tools as safety gear first
Kevin O’Connor starts the segment by calling Mark McCullough a guy who loves a fire, and Mark’s table makes that clear. But the first tool is not decorative. It is the extinguisher. That is the piece to reach for when something goes wrong, and it sets the tone for the rest of the set.
Tongs keep hands out of the fire when moving logs. A screen keeps sparks away from nearby wood flooring, especially where masonry ends and the room begins. Long matches add reach, which matters more than aesthetics when you are trying not to lean into the firebox. The grate elevates logs and creates air space for starting and maintaining a fire. Andirons do similar work with more decoration, and Mark uses them in conjunction with the grate because he likes the look. The grate remains the functional core.
A poker adjusts logs. A shovel with a dustpan-like edge cleans ash. The broom waits until embers are cool. That last point is the one people rush. Hot embers do not care that the fire looks out.
This is more of a tool literacy segment than a repair, which puts it in the same territory as Mark’s spot-pointing walkthrough in S24E3. He is good at explaining what a tool is for, not just what it is called. The realistic homeowner takeaway is simple: buy the extinguisher before the antique screen, and keep the screen in front of an open fire instead of trusting the fire to stay put.
Tom Silva builds a rolling rack for six storage totes
Tom Silva’s project begins with a familiar annoyance: the tote you need is always at the bottom of the stack. His solution is a rack that lets each bin slide out on its own shelf. Kevin calls it rough framing with 2x4s, and that is accurate.
Tom chooses 2x4s over 2x3s or one-bys because the extra material gives screws more meat to bite into. He uses deck screws instead of drywall screws. Drywall screws are brittle and can snap. Deck screws also have a little groove at the tip, like a drill bit, that helps the screw start, holds better, and reduces splitting. That small fastener detail echoes Tom’s nail shank lesson in S24E6. The hardware is not an afterthought. It is the reason the rack survives being rolled around a basement.
The template is the heart of the build. Tom measures 13.5 inches for the tote height, adds a 1-inch gap, and marks 14.5 inches to the top of the cleat. The cleat itself is 3.5 inches wide. He adds a 2-inch top gap and calls it 3 inches, then repeats the spacing. The important part is not memorizing his numbers. It is making a template so all eight uprights get marked the same way.
Cleats run 30 inches for totes that are about 29 inches long. Upright spacing uses 20.5 inches for the tote width plus 1.5 inches for the 2x4 thickness. The overall length for the four horizontal pieces comes to 67.5 inches. Four diagonal blocks stiffen the back. Four swivel casters go on the bottom, secured with short structural screws. Tom checks square and finds the frame 1/32 inch off, which he accepts. For storage bins, that is close enough. For finish carpentry, it would be a different conversation.
The rack is a good beginner project if you can crosscut eight uprights, mark consistently, and drive screws without splitting. The casters are easy. The cleat layout is the whole trick. Get that wrong and the bins fight you every time.
What the edit leaves out
Television makes sod cutting, rototilling, eight crosscuts, squaring a frame, and loading six bins look like an afternoon. The planting segment compresses two weeks of watering into a sentence. The rack segment compresses measuring, cutting, and assembly into a few minutes. The fireplace segment compresses a tool audit into a tabletop demo.
None of that is a criticism. It is a reminder that the useful information is often in the preparation: the 40-inch bed depth, the root-bound scoring, the 1-inch gaps between totes, the deck screw tip, the extinguisher at the front of the set. Those details are what make the work last longer than the episode.
DIY Confidence Scale
- Lee’s arborvitae privacy border: 3/5. Marking a bed and planting a container-grown tree is manageable. Sod removal, rototilling, and two weeks of watering are the real labor. Choose the mature size before you choose the plant.
- Mark’s fireplace tool tour: 2/5. This is mostly shopping, placement, and safety awareness. Buy the extinguisher, use the screen, and do not grab hot logs with your hands.
- Tom’s rolling tote rack: 3/5. Simple framing, but the template and cleat spacing decide whether it works. Deck screws and square cuts make it a satisfying weekend build.
Additional Resources
Which would solve more friction at your house: a screen that keeps sparks off the floor, or a rack that keeps the holiday bin from becoming a load-bearing wall?
From the captions
Spotted on the job
Tools, materials, and techniques the episode actually showed or discussed. Names stay generic unless the episode said a brand. A name links to an Amazon search only when it is something a person could buy.
As an Amazon Associate, This Old Recap earns from qualifying purchases.
Material
DIY-friendly
arborvitae
Lee and Rhonda planted arborvitaes along the fence to create privacy and add texture.
Tool
DIY-friendly
rototiller
Lee used a rototiller to loosen the soil and let oxygen in before planting.
Material
DIY-friendly
compost
Amazon search for compost (opens in a new tab)
Lee mixed compost into the planting bed to improve the soil for the trees.
Material
DIY-friendly
mulch
Lee applied mulch around the new trees to hold moisture in the soil.
Material
DIY-friendly
2x4
Tom used 2x4s to build the uprights, shelves, and cleats for the storage rack.
Product
DIY-friendly
deck screws
Tom used deck screws to assemble the storage rack without needing pilot holes.
Product
DIY-friendly
casters
Tom installed casters on the corners of the rack so it could roll into place.
Tool
DIY-friendly
tongs
Mark showed fireplace tongs used to grip and move logs safely in the fire.
The weekly recap
Get each new recap in your inbox the week it airs.
One email the week the new episodes are up, with links back to the full write-ups. Confirm once. Unsubscribe any time.
Keep reading
Related recaps
Also about Landscaping
Ask This Old House · S25 E2
Ask This Old House S25E2: Pull-Chain Basement Lights, Sod Repair, and an Orange Deck-Board Spacer
Also about Landscaping
Ask This Old House · S23 E10
Ask This Old House Season 23 Episode 10: Trash Pullout Replacement, Light Bulb Phaseout, and Arborvitae Removal, or a 1997 Kitchen Finally Slides Smoothly
Also about Carpentry
This Old House · S48 E3
This Old House S48 E3: Essex County Colonial Bathroom Tile, a Story Pole, and the Beam That Was Cut
Also about Landscaping
Ask This Old House · S25 E1